|
|
To err might be human, but to really handle the consequences well takes a top-notch revision control system. In this chapter, we’ll discuss some of the techniques you can use when you find that a problem has crept into your project. Mercurial has some highly capable features that will help you to isolate the sources of problems, and to handle them appropriately.
I have the occasional but persistent problem of typing rather more quickly than I can think, which sometimes results in me committing a changeset that is either incomplete or plain wrong. In my case, the usual kind of incomplete changeset is one in which I’ve created a new source file, but forgotten to “hg add” it. A “plain wrong” changeset is not as common, but no less annoying.
In section 4.2.2, I mentioned that Mercurial treats each modification of a repository as a transaction. Every time you commit a changeset or pull changes from another repository, Mercurial remembers what you did. You can undo, or roll back, exactly one of these actions using the “hg rollback” command. (See section 9.1.4 for an important caveat about the use of this command.)
Here’s a mistake that I often find myself making: committing a change in which I’ve created a new file, but forgotten to “hg add” it.
Looking at the output of “hg status” after the commit immediately confirms the error.
The commit captured the changes to the file a, but not the new file b. If I were to push this changeset to a repository that I shared with a colleague, the chances are high that something in a would refer to b, which would not be present in their repository when they pulled my changes. I would thus become the object of some indignation.
However, luck is with me—I’ve caught my error before I pushed the changeset. I use the “hg rollback” command, and Mercurial makes that last changeset vanish.
Notice that the changeset is no longer present in the repository’s history, and the working directory once again thinks that the file a is modified. The commit and rollback have left the working directory exactly as it was prior to the commit; the changeset has been completely erased. I can now safely “hg add” the file b, and rerun my commit.
It’s common practice with Mercurial to maintain separate development branches of a project in different repositories. Your development team might have one shared repository for your project’s “0.9” release, and another, containing different changes, for the “1.0” release.
Given this, you can imagine that the consequences could be messy if you had a local “0.9” repository, and accidentally pulled changes from the shared “1.0” repository into it. At worst, you could be paying insufficient attention, and push those changes into the shared “0.9” tree, confusing your entire team (but don’t worry, we’ll return to this horror scenario later). However, it’s more likely that you’ll notice immediately, because Mercurial will display the URL it’s pulling from, or you will see it pull a suspiciously large number of changes into the repository.
The “hg rollback” command will work nicely to expunge all of the changesets that you just pulled. Mercurial groups all changes from one “hg pull” into a single transaction, so one “hg rollback” is all you need to undo this mistake.
The value of the “hg rollback” command drops to zero once you’ve pushed your changes to another repository. Rolling back a change makes it disappear entirely, but only in the repository in which you perform the “hg rollback”. Because a rollback eliminates history, there’s no way for the disappearance of a change to propagate between repositories.
If you’ve pushed a change to another repository—particularly if it’s a shared repository—it has essentially “escaped into the wild,” and you’ll have to recover from your mistake in a different way. What will happen if you push a changeset somewhere, then roll it back, then pull from the repository you pushed to, is that the changeset will reappear in your repository.
(If you absolutely know for sure that the change you want to roll back is the most recent change in the repository that you pushed to, and you know that nobody else could have pulled it from that repository, you can roll back the changeset there, too, but you really should really not rely on this working reliably. If you do this, sooner or later a change really will make it into a repository that you don’t directly control (or have forgotten about), and come back to bite you.)
Mercurial stores exactly one transaction in its transaction log; that transaction is the most recent one that occurred in the repository. This means that you can only roll back one transaction. If you expect to be able to roll back one transaction, then its predecessor, this is not the behaviour you will get.
Once you’ve rolled back one transaction in a repository, you can’t roll back again in that repository until you perform another commit or pull.
If you make a modification to a file, and decide that you really didn’t want to change the file at all, and you haven’t yet committed your changes, the “hg revert” command is the one you’ll need. It looks at the changeset that’s the parent of the working directory, and restores the contents of the file to their state as of that changeset. (That’s a long-winded way of saying that, in the normal case, it undoes your modifications.)
Let’s illustrate how the “hg revert” command works with yet another small example. We’ll begin by modifying a file that Mercurial is already tracking.
If we don’t want that change, we can simply “hg revert” the file.
The “hg revert” command provides us with an extra degree of safety by saving our modified file with a .orig extension.
Here is a summary of the cases that the “hg revert” command can deal with. We will describe each of these in more detail in the section that follows.
The “hg revert” command is useful for more than just modified files. It lets you reverse the results of all of Mercurial’s file management commands—“hg add”, “hg remove”, and so on.
If you “hg add” a file, then decide that in fact you don’t want Mercurial to track it, use “hg revert” to undo the add. Don’t worry; Mercurial will not modify the file in any way. It will just “unmark” the file.
Similarly, if you ask Mercurial to “hg remove” a file, you can use “hg revert” to restore it to the contents it had as of the parent of the working directory.
This works just as well for a file that you deleted by hand, without telling Mercurial (recall that in Mercurial terminology, this kind of file is called “missing”).
If you revert a “hg copy”, the copied-to file remains in your working directory afterwards, untracked. Since a copy doesn’t affect the copied-from file in any way, Mercurial doesn’t do anything with the copied-from file.
If you “hg rename” a file, there is one small detail that you should remember. When you “hg revert” a rename, it’s not enough to provide the name of the renamed-to file, as you can see here.
As you can see from the output of “hg status”, the renamed-to file is no longer identified as added, but the renamed-from file is still removed! This is counter-intuitive (at least to me), but at least it’s easy to deal with.
So remember, to revert a “hg rename”, you must provide both the source and destination names.
(By the way, if you rename a file, then modify the renamed-to file, then revert both components of the rename, when Mercurial restores the file that was removed as part of the rename, it will be unmodified. If you need the modifications in the renamed-to file to show up in the renamed-from file, don’t forget to copy them over.)
These fiddly aspects of reverting a rename arguably constitute a small bug in Mercurial.
Consider a case where you have committed a change a, and another change b on top of it; you then realise that change a was incorrect. Mercurial lets you “back out” an entire changeset automatically, and building blocks that let you reverse part of a changeset by hand.
Before you read this section, here’s something to keep in mind: the “hg backout” command undoes changes by adding history, not by modifying or erasing it. It’s the right tool to use if you’re fixing bugs, but not if you’re trying to undo some change that has catastrophic consequences. To deal with those, see section 9.4.
The “hg backout” command lets you “undo” the effects of an entire changeset in an automated fashion. Because Mercurial’s history is immutable, this command does not get rid of the changeset you want to undo. Instead, it creates a new changeset that reverses the effect of the to-be-undone changeset.
The operation of the “hg backout” command is a little intricate, so let’s illustrate it with some examples. First, we’ll create a repository with some simple changes.
The “hg backout” command takes a single changeset ID as its argument; this is the changeset to back out. Normally, “hg backout” will drop you into a text editor to write a commit message, so you can record why you’re backing the change out. In this example, we provide a commit message on the command line using the -m option.
We’re going to start by backing out the last changeset we committed.
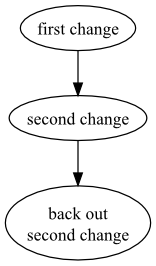
You can see that the second line from myfile is no longer present. Taking a look at the output of “hg log” gives us an idea of what the “hg backout” command has done.
Notice that the new changeset that “hg backout” has created is a child of the changeset we backed out. It’s easier to see this in figure 9.1, which presents a graphical view of the change history. As you can see, the history is nice and linear.
If you want to back out a change other than the last one you committed, pass the --merge option to the “hg backout” command.
This makes backing out any changeset a “one-shot” operation that’s usually simple and fast.
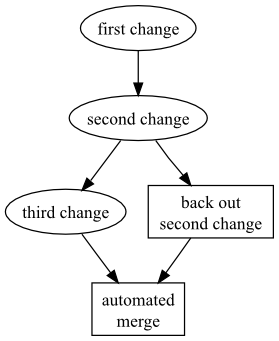
If you take a look at the contents of myfile after the backout finishes, you’ll see that the first and third changes are present, but not the second.
As the graphical history in figure 9.2 illustrates, Mercurial actually commits two changes in this kind of situation (the box-shaped nodes are the ones that Mercurial commits automatically). Before Mercurial begins the backout process, it first remembers what the current parent of the working directory is. It then backs out the target changeset, and commits that as a changeset. Finally, it merges back to the previous parent of the working directory, and commits the result of the merge.
The result is that you end up “back where you were”, only with some extra history that undoes the effect of the changeset you wanted to back out.
In fact, since the --merge option will do the “right thing” whether or not the changeset you’re backing out is the tip (i.e. it won’t try to merge if it’s backing out the tip, since there’s no need), you should always use this option when you run the “hg backout” command.
While I’ve recommended that you always use the --merge option when backing out a change, the “hg backout” command lets you decide how to merge a backout changeset. Taking control of the backout process by hand is something you will rarely need to do, but it can be useful to understand what the “hg backout” command is doing for you automatically. To illustrate this, let’s clone our first repository, but omit the backout change that it contains.
As with our earlier example, We’ll commit a third changeset, then back out its parent, and see what happens.
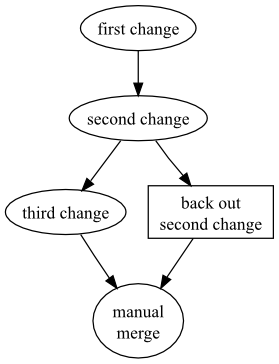
Our new changeset is again a descendant of the changeset we backout out; it’s thus a new head, not a descendant of the changeset that was the tip. The “hg backout” command was quite explicit in telling us this.
Again, it’s easier to see what has happened by looking at a graph of the revision history, in figure 9.3. This makes it clear that when we use “hg backout” to back out a change other than the tip, Mercurial adds a new head to the repository (the change it committed is box-shaped).
After the “hg backout” command has completed, it leaves the new “backout” changeset as the parent of the working directory.
Now we have two isolated sets of changes.
Let’s think about what we expect to see as the contents of myfile now. The first change should be present, because we’ve never backed it out. The second change should be missing, as that’s the change we backed out. Since the history graph shows the third change as a separate head, we don’t expect to see the third change present in myfile.
To get the third change back into the file, we just do a normal merge of our two heads.
Afterwards, the graphical history of our repository looks like figure 9.4.
Here’s a brief description of how the “hg backout” command works.
An alternative way to implement the “hg backout” command would be to “hg export” the to-be-backed-out changeset as a diff, then use the --reverse option to the patch command to reverse the effect of the change without fiddling with the working directory. This sounds much simpler, but it would not work nearly as well.
The reason that “hg backout” does an update, a commit, a merge, and another commit is to give the merge machinery the best chance to do a good job when dealing with all the changes between the change you’re backing out and the current tip.
If you’re backing out a changeset that’s 100 revisions back in your project’s history, the chances that the patch command will be able to apply a reverse diff cleanly are not good, because intervening changes are likely to have “broken the context” that patch uses to determine whether it can apply a patch (if this sounds like gibberish, see 12.4 for a discussion of the patch command). Also, Mercurial’s merge machinery will handle files and directories being renamed, permission changes, and modifications to binary files, none of which patch can deal with.
Most of the time, the “hg backout” command is exactly what you need if you want to undo the effects of a change. It leaves a permanent record of exactly what you did, both when committing the original changeset and when you cleaned up after it.
On rare occasions, though, you may find that you’ve committed a change that really should not be present in the repository at all. For example, it would be very unusual, and usually considered a mistake, to commit a software project’s object files as well as its source files. Object files have almost no intrinsic value, and they’re big, so they increase the size of the repository and the amount of time it takes to clone or pull changes.
Before I discuss the options that you have if you commit a “brown paper bag” change (the kind that’s so bad that you want to pull a brown paper bag over your head), let me first discuss some approaches that probably won’t work.
Since Mercurial treats history as accumulative—every change builds on top of all changes that preceded it—you generally can’t just make disastrous changes disappear. The one exception is when you’ve just committed a change, and it hasn’t been pushed or pulled into another repository. That’s when you can safely use the “hg rollback” command, as I detailed in section 9.1.2.
After you’ve pushed a bad change to another repository, you could still use “hg rollback” to make your local copy of the change disappear, but it won’t have the consequences you want. The change will still be present in the remote repository, so it will reappear in your local repository the next time you pull.
If a situation like this arises, and you know which repositories your bad change has propagated into, you can try to get rid of the changeefrom every one of those repositories. This is, of course, not a satisfactory solution: if you miss even a single repository while you’re expunging, the change is still “in the wild”, and could propagate further.
If you’ve committed one or more changes after the change that you’d like to see disappear, your options are further reduced. Mercurial doesn’t provide a way to “punch a hole” in history, leaving changesets intact.
XXX This needs filling out. The hg-replay script in the examples directory works, but doesn’t handle merge changesets. Kind of an important omission.
If you’ve committed some changes to your local repository and they’ve been pushed or pulled somewhere else, this isn’t necessarily a disaster. You can protect yourself ahead of time against some classes of bad changeset. This is particularly easy if your team usually pulls changes from a central repository.
By configuring some hooks on that repository to validate incoming changesets (see chapter 10), you can automatically prevent some kinds of bad changeset from being pushed to the central repository at all. With such a configuration in place, some kinds of bad changeset will naturally tend to “die out” because they can’t propagate into the central repository. Better yet, this happens without any need for explicit intervention.
For instance, an incoming change hook that verifies that a changeset will actually compile can prevent people from inadvertantly “breaking the build”.
While it’s all very well to be able to back out a changeset that introduced a bug, this requires that you know which changeset to back out. Mercurial provides an invaluable command, called “hg bisect”, that helps you to automate this process and accomplish it very efficiently.
The idea behind the “hg bisect” command is that a changeset has introduced some change of behaviour that you can identify with a simple binary test. You don’t know which piece of code introduced the change, but you know how to test for the presence of the bug. The “hg bisect” command uses your test to direct its search for the changeset that introduced the code that caused the bug.
Here are a few scenarios to help you understand how you might apply this command.
From these examples, it should be clear that the “hg bisect” command is not useful only for finding the sources of bugs. You can use it to find any “emergent property” of a repository (anything that you can’t find from a simple text search of the files in the tree) for which you can write a binary test.
We’ll introduce a little bit of terminology here, just to make it clear which parts of the search process are your responsibility, and which are Mercurial’s. A test is something that you run when “hg bisect” chooses a changeset. A probe is what “hg bisect” runs to tell whether a revision is good. Finally, we’ll use the word “bisect”, as both a noun and a verb, to stand in for the phrase “search using the “hg bisect” command.
One simple way to automate the searching process would be simply to probe every changeset. However, this scales poorly. If it took ten minutes to test a single changeset, and you had 10,000 changesets in your repository, the exhaustive approach would take on average 35 days to find the changeset that introduced a bug. Even if you knew that the bug was introduced by one of the last 500 changesets, and limited your search to those, you’d still be looking at over 40 hours to find the changeset that introduced your bug.
What the “hg bisect” command does is use its knowledge of the “shape” of your project’s revision history to perform a search in time proportional to the logarithm of the number of changesets to check (the kind of search it performs is called a dichotomic search). With this approach, searching through 10,000 changesets will take less than three hours, even at ten minutes per test (the search will require about 14 tests). Limit your search to the last hundred changesets, and it will take only about an hour (roughly seven tests).
The “hg bisect” command is aware of the “branchy” nature of a Mercurial project’s revision history, so it has no problems dealing with branches, merges, or multiple heads in a repoository. It can prune entire branches of history with a single probe, which is how it operates so efficiently.
Here’s an example of “hg bisect” in action.
Now let’s create a repository, so that we can try out the “hg bisect” command in isolation.
We’ll simulate a project that has a bug in it in a simple-minded way: create trivial changes in a loop, and nominate one specific change that will have the “bug”. This loop creates 35 changesets, each adding a single file to the repository. We’ll represent our “bug” with a file that contains the text “i have a gub”.
The next thing that we’d like to do is figure out how to use the “hg bisect” command. We can use Mercurial’s normal built-in help mechanism for this.
The “hg bisect” command works in steps. Each step proceeds as follows.
The process ends when “hg bisect” identifies a unique changeset that marks the point where your test transitioned from “succeeding” to “failing”.
To start the search, we must run the “hg bisect --reset” command.
In our case, the binary test we use is simple: we check to see if any file in the repository contains the string “i have a gub”. If it does, this changeset contains the change that “caused the bug”. By convention, a changeset that has the property we’re searching for is “bad”, while one that doesn’t is “good”.
Most of the time, the revision to which the working directory is synced (usually the tip) already exhibits the problem introduced by the buggy change, so we’ll mark it as “bad”.
Our next task is to nominate a changeset that we know doesn’t have the bug; the “hg bisect” command will “bracket” its search between the first pair of good and bad changesets. In our case, we know that revision 10 didn’t have the bug. (I’ll have more words about choosing the first “good” changeset later.)
Notice that this command printed some output.
We now run our test in the working directory. We use the grep command to see if our “bad” file is present in the working directory. If it is, this revision is bad; if not, this revision is good.
This test looks like a perfect candidate for automation, so let’s turn it into a shell function.
We can now run an entire test step with a single command, mytest.
A few more invocations of our canned test step command, and we’re done.
Even though we had 40 changesets to search through, the “hg bisect” command let us find the changeset that introduced our “bug” with only five tests. Because the number of tests that the “hg bisect” command grows logarithmically with the number of changesets to search, the advantage that it has over the “brute force” search approach increases with every changeset you add.
When you’re finished using the “hg bisect” command in a repository, you can use the “hg bisect reset” command to drop the information it was using to drive your search. The command doesn’t use much space, so it doesn’t matter if you forget to run this command. However, “hg bisect” won’t let you start a new search in that repository until you do a “hg bisect reset”.
The “hg bisect” command requires that you correctly report the result of every test you perform. If you tell it that a test failed when it really succeeded, it might be able to detect the inconsistency. If it can identify an inconsistency in your reports, it will tell you that a particular changeset is both good and bad. However, it can’t do this perfectly; it’s about as likely to report the wrong changeset as the source of the bug.
When I started using the “hg bisect” command, I tried a few times to run my tests by hand, on the command line. This is an approach that I, at least, am not suited to. After a few tries, I found that I was making enough mistakes that I was having to restart my searches several times before finally getting correct results.
My initial problems with driving the “hg bisect” command by hand occurred even with simple searches on small repositories; if the problem you’re looking for is more subtle, or the number of tests that “hg bisect” must perform increases, the likelihood of operator error ruining the search is much higher. Once I started automating my tests, I had much better results.
The key to automated testing is twofold:
In my tutorial example above, the grep command tests for the symptom, and the if statement takes the result of this check and ensures that we always feed the same input to the “hg bisect” command. The mytest function marries these together in a reproducible way, so that every test is uniform and consistent.
Because the output of a “hg bisect” search is only as good as the input you give it, don’t take the changeset it reports as the absolute truth. A simple way to cross-check its report is to manually run your test at each of the following changesets:
It’s possible that your search for one bug could be disrupted by the presence of another. For example, let’s say your software crashes at revision 100, and worked correctly at revision 50. Unknown to you, someone else introduced a different crashing bug at revision 60, and fixed it at revision 80. This could distort your results in one of several ways.
It is possible that this other bug completely “masks” yours, which is to say that it occurs before your bug has a chance to manifest itself. If you can’t avoid that other bug (for example, it prevents your project from building), and so can’t tell whether your bug is present in a particular changeset, the “hg bisect” command cannot help you directly. Instead, you can mark a changeset as untested by running “hg bisect --skip”.
A different problem could arise if your test for a bug’s presence is not specific enough. If you check for “my program crashes”, then both your crashing bug and an unrelated crashing bug that masks it will look like the same thing, and mislead “hg bisect”.
Another useful situation in which to use “hg bisect --skip” is if you can’t test a revision because your project was in a broken and hence untestable state at that revision, perhaps because someone checked in a change that prevented the project from building.
Choosing the first “good” and “bad” changesets that will mark the end points of your search is often easy, but it bears a little discussion nevertheless. From the perspective of “hg bisect”, the “newest” changeset is conventionally “bad”, and the older changeset is “good”.
If you’re having trouble remembering when a suitable “good” change was, so that you can tell “hg bisect”, you could do worse than testing changesets at random. Just remember to eliminate contenders that can’t possibly exhibit the bug (perhaps because the feature with the bug isn’t present yet) and those where another problem masks the bug (as I discussed above).
Even if you end up “early” by thousands of changesets or months of history, you will only add a handful of tests to the total number that “hg bisect” must perform, thanks to its logarithmic behaviour.